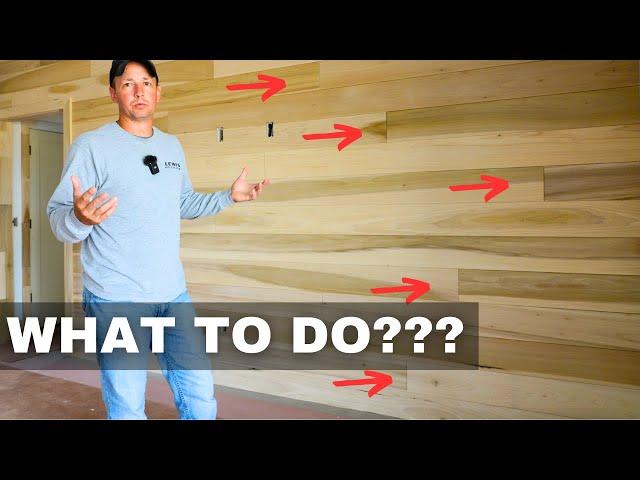
Accenting Butt Joints... Did This Detail Help???
Комментарии:

It's a feature! I love it
Ответить
Great detail! You and your team are true artists!
Ответить
I built a log house in 2007. It was a D-log style log with all the interior walls made from tongue and groove cypress. I couldn't stand the butt joints, so I put a v bit in my trim router and went down the center of each butt joint. Everyone was amazed at the difference it made.
Ответить
What a great detail on those butt joints. You are truly a master of your craft.
Ответить
Thanks
Ответить
Am trim carpenter. IMO that was the right move
Ответить
Yep, that's an in look right now. Good call.
Ответить
Nice, glad your back 👍
Ответить
it is just the same as the v shape on vinyl flooring. Nothing fancy.
Ответить
What spacing would you recommend for face nailing on ship lap?
Ответить
I love your knowledge Senor Lewis..... Being from the NE, not the midwest, I'd LOVE to see how poplar takes a stain because I've never had luck or shall I say people never do it around here we consider it more of a painting species..... Any help would be great!!!
Ответить
Please keep these coming. Your content is immensely valuable. Thanks!
Ответить
Very good work. I’d like to know how you free handed such a straight line with the router
Ответить
Without your mod those butt splices would've looked very odd, maybe even butt ugly.....
Ответить
Those walls look fantastic. I agree that accenting the joint is a better look than trying to hide them. And anyone criticizing you for using the material the job calls for has no clue as to what they're talking about.
Ответить
Love the nickel gap! Love the end gaps as well. I never thought that Poplar would look good on an accent wall, but it looks great! I hope to see a finished video.
Ответить
I'm paying a little under $4 a bf for poplar here. Just bought some white oak and it's $9-12+ a bf. Thats wholesale price in my area. We trim a lot in alder here.
Ответить
Good to see you back.
I had the same problem with pine and had a dedicated bit made that cuts a groove and micro bevels the edge.

Nice detail
Ответить
Fantastic detail. I've done this before but I used a standard adjustable rabbeting bit. That small offset bit is really cool and I'll be picking that one up to add to the arsenal! I much prefer working with poplar as it machines easily and takes paint or stain nicely, too. However, when I have clients looking for a more uniform appearance grain wise, I'll use a different species (maple, oak, etc.) and machine the T&G myself. I try to pick a species that is already in the home for consistency.
For those clients that don't these details, I find a scarfed joint does a very good job of blending the seam, or I will use the Festool Domino to make it a solid butt joint.

Absolutely looks better controlled ugly I've only used poplar for paint because of the different colors. It's good to see you back at it thanks for sharing
Ответить
That’s a great looking shadow line that I bet would really shine painted ! Hope your family is well Spence in my prayers ! Is there a video in the Queue for “ Flat Crown w/ a shadow line “?
Ответить
The gap on the butt joint looks fine to me! Kinda like the v groove you can do when joining large ply panels to hide joint lines.
Ответить
I saw poplar dyed, not stained, back when I was just getting started in the trade. It was an untrained eye, but I remember being impressed as to how well everything blended together. Thanks for the video.
Ответить
I love nickel back
Ответить
Yep, T&G edge matched panelling has been used forever. If you had routed the long side edges for T&G with same profile as long edges, it'd be tough to screw up the butt joints.
Ответить
Great solution! I would love to see the finished product once stained.
Ответить
Bidenomics that’s quarter gap isn’t it! ?
Ответить
Do you still recommend your cordless Dewalt biscuit joiner?
Ответить
Thank god your back!!
Ответить
Looks good, much better than trying to hide it. Do you route the end of both boards or just one?
Ответить
Are you only routeing one edge of the butt joint or both ends?
Ответить
I have notice in your installs, you have use a lot of poplar for staining. do you have any pictures or videos of the finished stained poplar? I have only painted poplar.
Ответить
I agree. Butts almost never hide. Problem with oak is it’s not very expensive looking unless you fill the grain. You make me miss the Midwest, especially when you talk about the price of hardwood.
Ответить
Amazing as always. Thank you
Ответить
0.38 The stone mason was escorted off the job?... Yes?
Ответить
Looks great.
Ответить
Being a floor layer I love the random boards.. the more random the better for me ..
Ответить
I just recently did this detail with MDF shiplap then was all painted white. Final product looks really good.
Ответить
Isn't that joint still going to open up as the wood shrinks because it's still a butt joint, just with a reveal?
Ответить
👏👏👏👏👏
Ответить
Thanks. Glad you're back.
Ответить
Clean looking job, as always! Funny enough I made a ton of shiplap out of 1/2” ply scrap from my work. I was thinking of what it would look like to have a gap when I butt the ends and this video helped me visualize that! I like the look a lot, but would be curious to see if it would still look as good painted
Ответить
well Done, an architect i do work for will often say, "if you can't hide a design detail, then celebrate it!"
Ответить
I have used this detail on a large deck. We called it celebrating the joints. It really can make or break a project, in my opinion. Nice to see you and learn more from you! You were missed.
Ответить
As a cabinetmaker, I use this technique all the time for field joints.
Ответить
Poplar is a stable wood. Yes it will move. If it's dry when you install and finish it then it will not shrink. So I don't see a problem. 10-15% will always gain water over time. So the width will move 1/64-1/4 for every foot. I know that the material has been on site for about a month and isn't going to move. If you work from the old way's then things move before you install them. If you follow just in time then you spend most of your time fixing what wood does over time, it moves.
I finish everything after install. I don't have problem or call backs. Well I guess I do in like two years to fix the guy that did stuff for less than me after I did the first part. And I don't like to tell them that I can't fix it, that it has to be replaced and done right. Then I give them two sample joints. One that I did right and the other one is wood that got put in water and then built. I tell them to put them in the oven at 100f and as after an hour they will look like what they see on their wall. Everything that they see shows up when the wet wood moves and the wood that was at 15% stays.

Nice work great detail for the butt joints. Never have been a big fan of stained or unfinished popular but that's not my/your decision, and high end install would look great for any species of wood. Ray
Ответить


